1964
Cheltenham Puku 4
Once the connoisseur’s choice of caravan in the 1960s and 1970s, testament to the design of the Cheltenham, a dedicated Owners Club has kept these models on the road for over 40 years since production ended. I had to get one for myself to discover what all the fuss is about.
Back in the earliest days of caravanning, caravan manufacturers generally came into being from amateur caravan builders who had so carefully cultivated their designs over several years. One of these early pioneers was Arthur Gardner, who built his own motorised caravan in 1920. Following four years of experimenting, he decided that a trailer caravan was a much better idea and founded a small manufacturing workshop in Cheltenham and began trading as Summerfield caravans. By 1927, he’d gained enough of a following to move across town to a larger factory, and the business was renamed the Cheltenham Caravan Company.
By the 1950s, Cheltenham caravans were at the forefront of design. As many popular manufacturers such as Eccles, Bluebird and the recently formed Sprite focused on building cheaper, simpler caravans for the masses, Cheltenham went in the opposite direction and were set upon building the best-designed tourers that they could. These would have to combine materials, assembly techniques and craftsmanship to make these caravans as strong as possible, but also keep their weight down. Arthur Gardner wanted his caravans to be the best all-rounders that you could buy. They should be every bit as beautiful as a Winchester or Carlight, but much more practical, easier to tow and lighter. Thankfully, he succeeded on all counts.

By the mid-1950s, Cheltenham pioneered a design to combine a GRP front and roof panel with aluminium side and rear panels to create an extremely aesthetically pleasing lightweight caravan, as this 1958 Kudu shows.
Cheltenham caravans were hugely popular. Every detail was important to the company, who even built their own pioneering lightweight triangulated steel chassis with twin independent coil spring suspension. This was light years ahead of other manufacturers, who used cumbersome square steel frame chassis designs with leaf spring suspension and a beam axle. To this day, Cheltenham caravans have the longest suspension springs ever fitted to a caravan. The result was a caravan that towed extremely well - so much so, that owners began to comment “you can hardly feel it on the back of the car”!
Crucial to Chelteham’s success was the Cheltenham Owners Club, which was established in 1950. Arthur Gardner and his wife would invite members to their farm once a year for a rally. Here they could share their ownership experiences, offer ideas to improve the designs further and Arthur could share details of new models and designs with loyal followers of the brand first. This was a genius move. This enabled the company to weed out design flaws at a very rapid pace, and also keep future customers keen and involved in the design process. These owners were proud to take their Cheltenham’s further than anyone else was going, even having an organised trip to the Arctic Circle in 1957, christening themselves ‘The Blue Nose Caravanners’. This was tremendous PR for the brand.

High profile caravanner Ralph Lee was an avid Cheltenham fan, taking his two berth Sable model to the Arctic Circle in 1957.
At the turn of the 1960s, the range now consisted of the 12ft 2-berth Sable, 12ft 3 (optional 4) berth Waterbuck, 15ft four berth Kudu and the flagship 16.5ft Springbok. Issues with the initial GRP design had been ironed out, and even the chassis had been improved further to include a hydraulic damper on the hitch for smoother braking (some three years before chassis maker to the industry B&B would offer one!) and a car-style ratchet handbrake from a car. These sound simple, but Cheltenham were doing this before anyone else in Europe, and they’re both industry standards now.
The only flaw in the range was the 15ft Kudu. This four berth had a very strange layout that consisted of a 4ft long dinette at the front that could be made into a double bed, a rear offside 6ft long bunk with a canvas bed above, chest of drawers/sideboard in the middle of the front dinette and rear bunk, nearside wardrobe over the axle next to the entrance door and a rear nearside corner washroom. The kitchen consisted of a cooker in a cupboard in the middle of the back panel between the offside bunk and washroom, and a separate sink area wedged in between the washroom and the wardrobe on the nearside. It made no sense at all.
The answer to this was the Puku 4, which turned out to be an equally problematic layout for four people. In late 1962, Cheltenham offered a Puku 2 and Puku 4 for the first time. The two berth copied and stretched the 12ft Sable layout with its large rear L-shape kitchen, and the Puku 4 revised the four berth layout to offer two entrance doors (one on each side of the caravan), two front 6ft long bunks (with one reducing to 4ft to clear the main entrance door), a rear nearside corner kitchen, rear offside corner washroom hiding the second entrance door, central wardrobe and china cabinet over the axle and opposite a 4ft long bench seat that would fold out in a rather convoluted way into a double bed, blocking off the kitchen and washroom. It didn’t work as a four berth, but as a luxury two berth, it was massively popular.
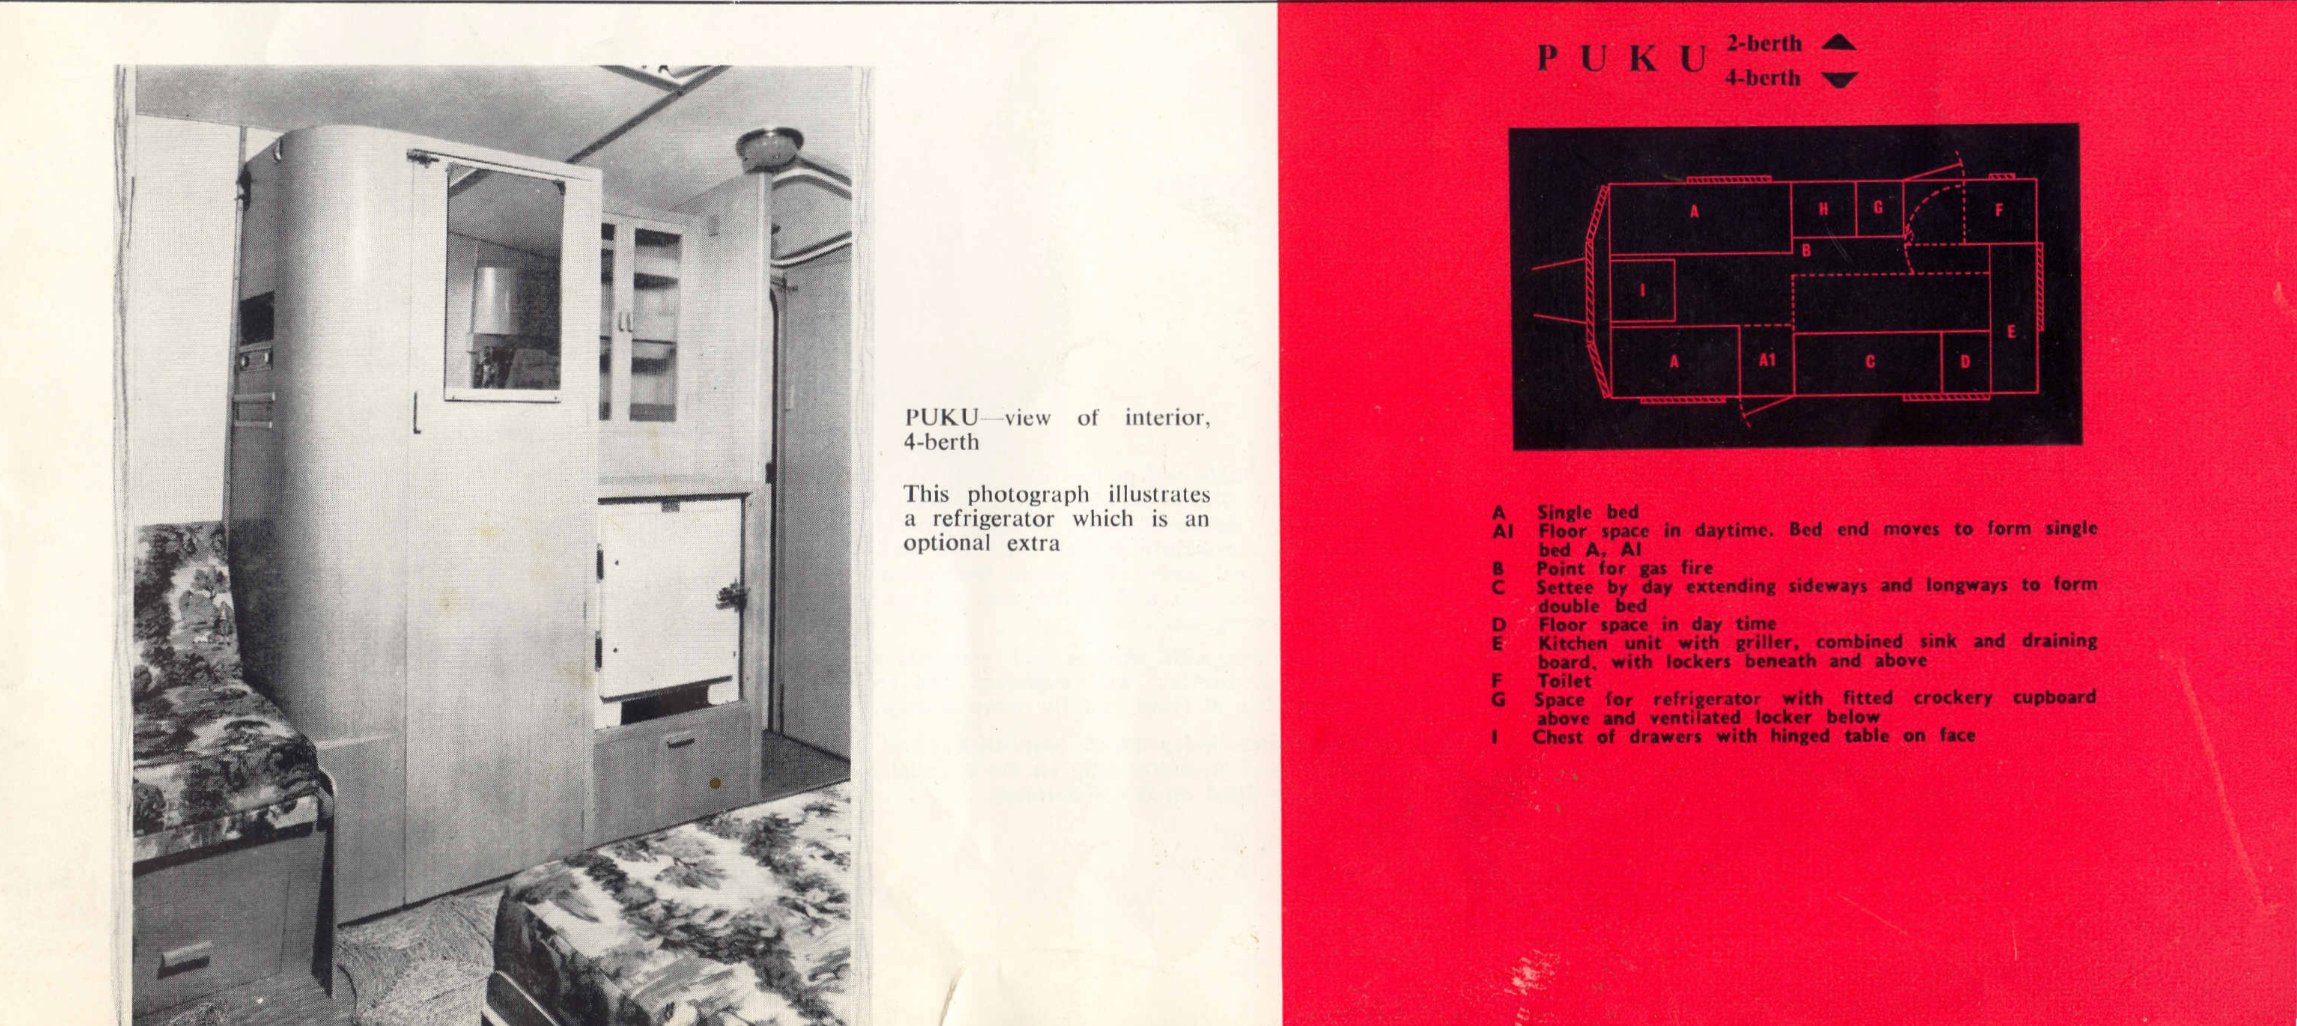
The strange Puku 4 layout is useless as a four berth, but brilliant for two people.
Despite its obvious flaws, and being joined by the much more successful 15ft Nyala four berth in 1966, the Puku 4 remained on offer until 1970, when the 15ft Roebuck replaced it and the more conventional Nyala continued to be produced.
An ailing Arthur Gardner struggled to keep the brand current and in demand in the early 1970s, despite so much support for Cheltenham from loyal owners. The Cheltenham Caravan Company was sold to rivals Stephens & West in 1975, who produced rival luxury brand Stirling and lighteweight Cygnet models, but following the sudden death of the new owner, Cheltenham was promptly re-sold again to Fernden Caravans, causing a production gap of three years. In late 1977, Fernden unveiled the next generation of Cheltenham caravans, still with the iconic bodyshell, but drastically updated interiors and specifications. Initially, the range was scaled back to offer just the Sable and Puku 2, which turned out to be permanent as the recession of 1980-82 pushed them out of business for good in 1982.
But this isn’t the end, not by a long way. The Cheltenham Owners Club was absolutely thriving, and a core membership of proud owners wouldn’t be seen to use anything else. The Bradleys set up business in the New Forest in the early 1980s not only restoring Cheltenham caravans, but upgrading them to current 1980s specifications, which included double glazing, newer heating systems, new kitchen appliances and even shower rooms. The Bradleys had enough support to stay in business until retirement in 2004! In 2024, there are still estimated to be a few hundred Cheltenham caravans on the road, with will over 100 of those belonging to the surviving Cheltenham Owners Club. Cheltenham caravans had proven themselves to be constantly renewable and a design that would stand the test of time.
I bought my own Puku 4 in April 2023.
I was innocently browsing the classified section of the Cheltenham Owners Club website, when I spotted this badly photographed and barely described Cheltenham for the princely sum of £500. Intrigued, I contacted the Chairman of the Club to ask if he knew anything about it, to which he declined and encouraged me to go and take a look. I liaised with the seller and blindly trekked all the way across the north of England to Cheshire with no real expectations of what I might find.

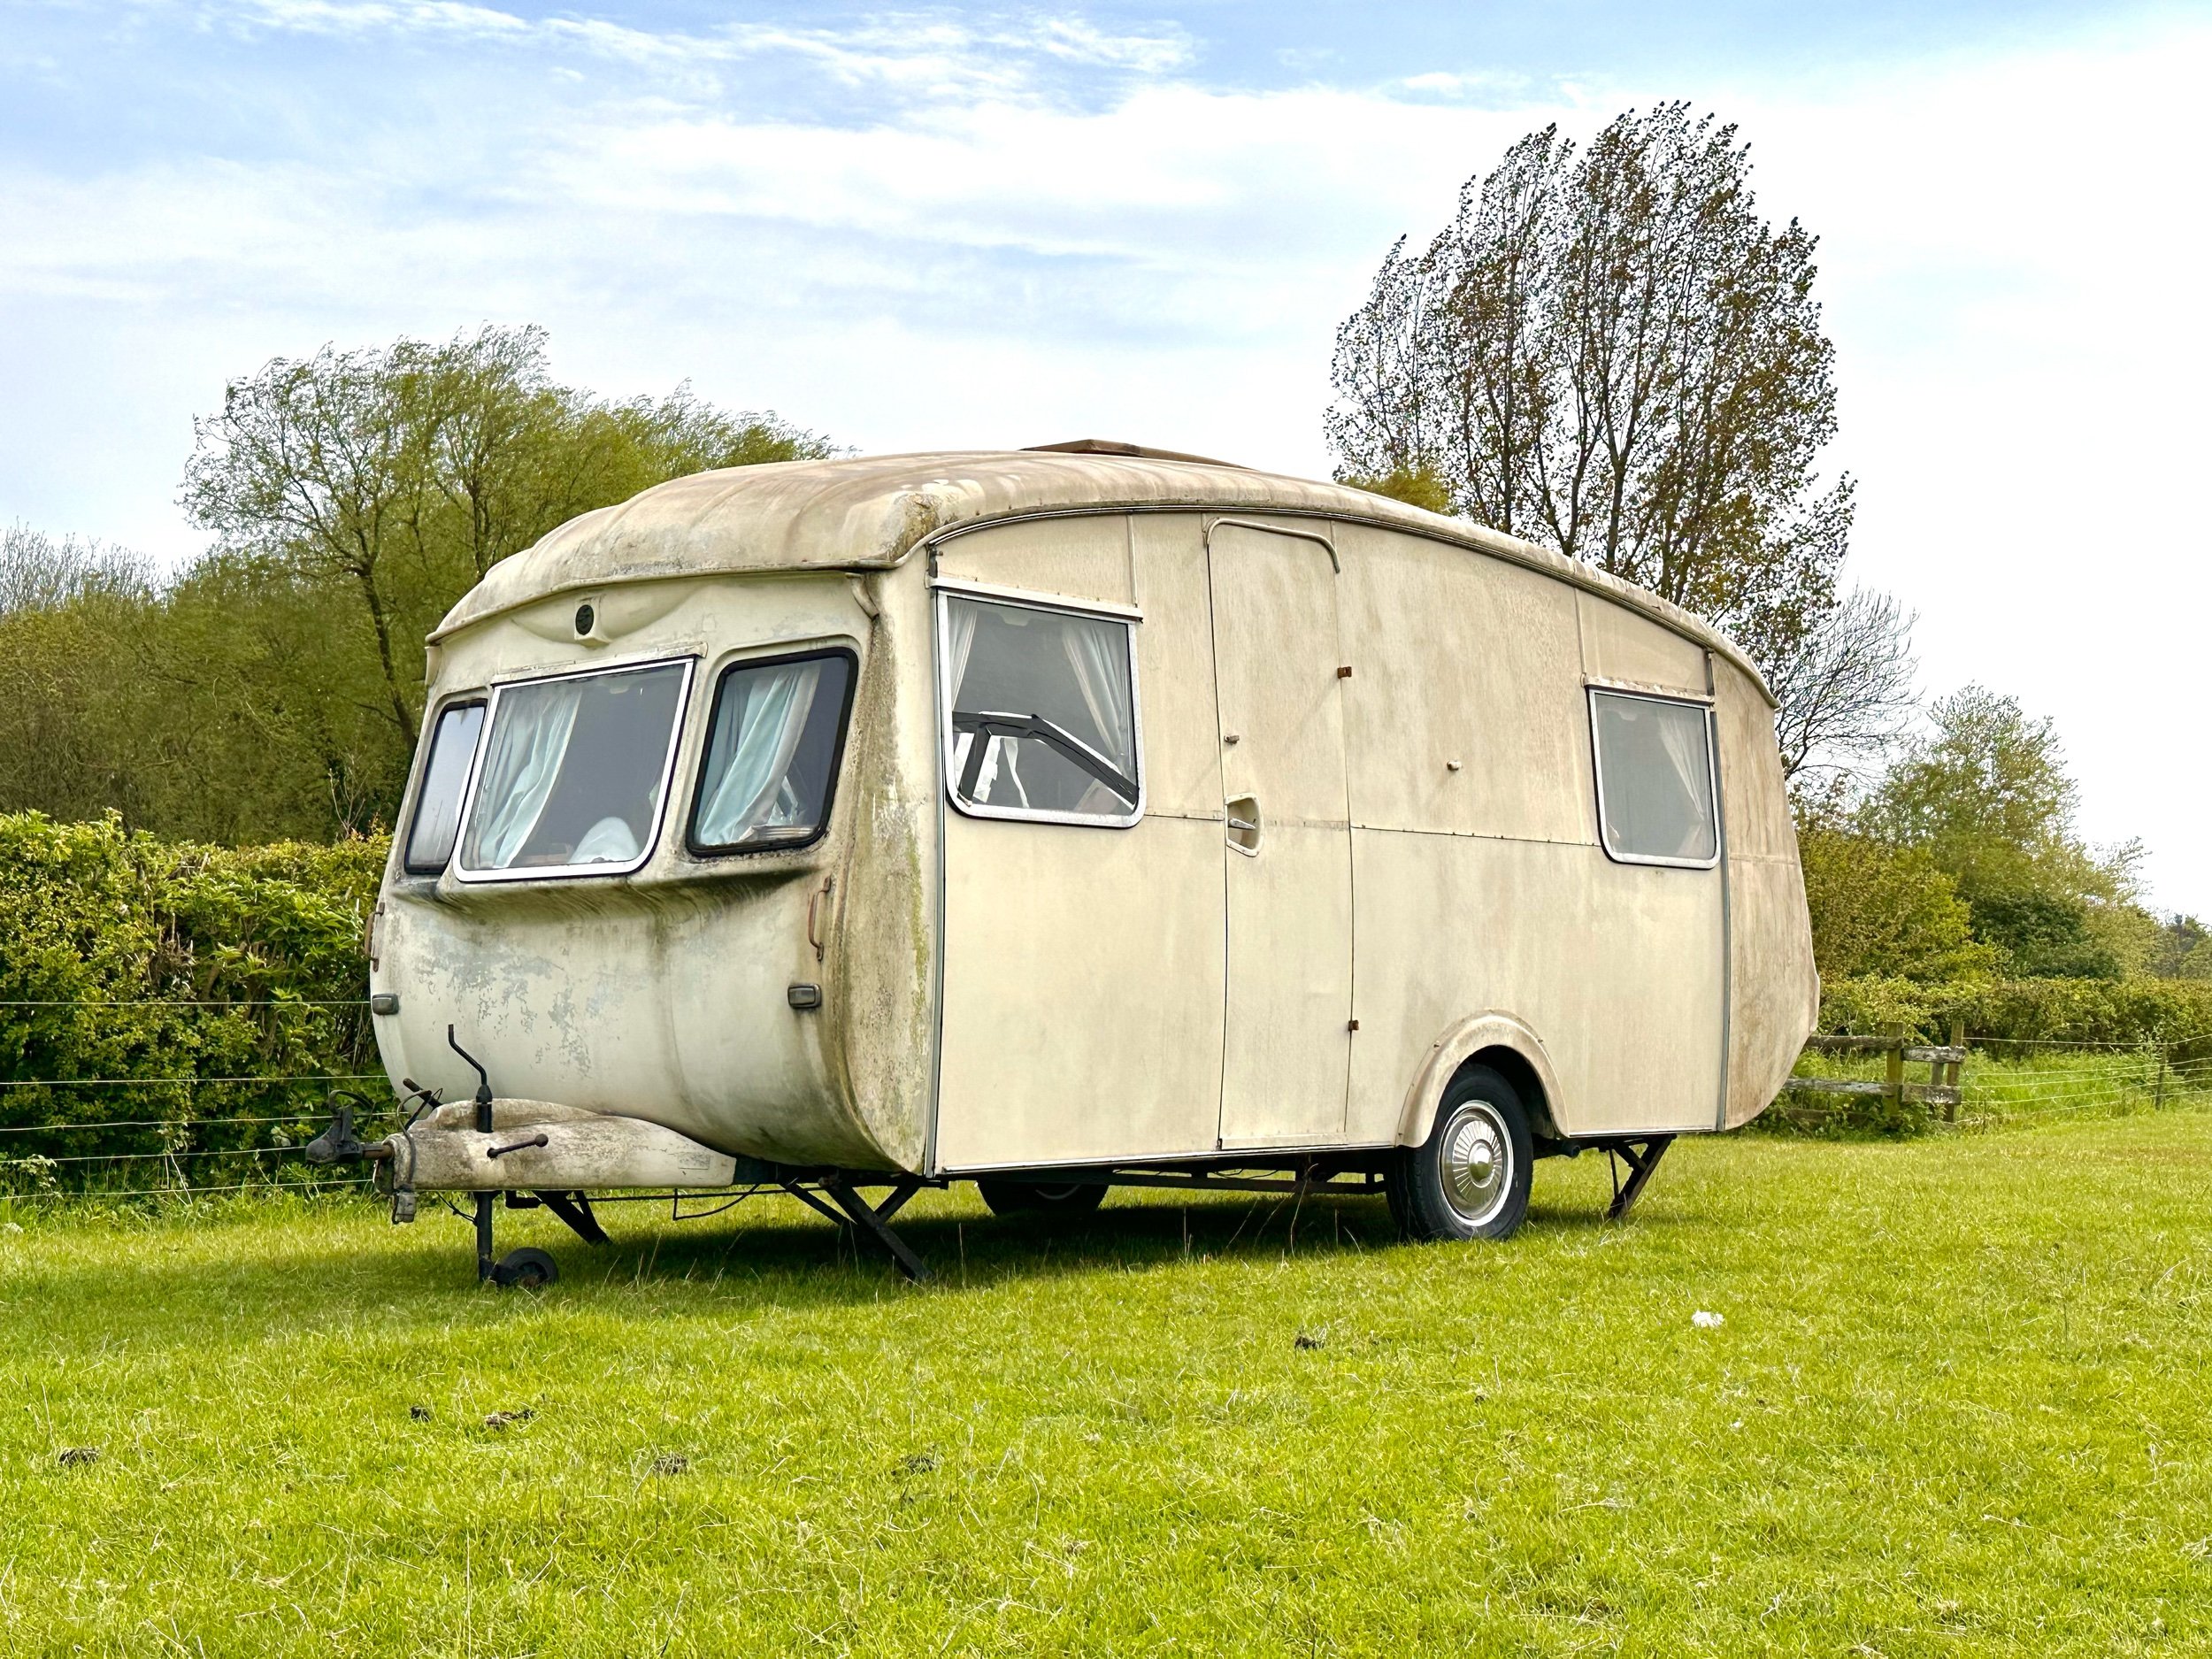
My 1964 Cheltenham Puku 4 had been languishing in this barn for over 30 years.
What I actually found was something of a diamond in the rough. I asked the seller did he know how long it had been kept in this car port: “Well we bought it before we got married…” he mused “and we got married in 1980”! I couldn’t believe it - had this Cheltenham been kept out of the elements for all this time…?
A closer inspection revealed that it had stood the test of time exceptionally well. The floor was solid, chassis was solid, the seams were in tact and the interior was damp free with the exception of the front fixed corner windows where the seals had shrunk and perished, which is pretty standard on a Cheltenham caravan.
Inside, it was pretty tired but crucially all-original and hadn’t been messed with. At a passing glance, I could work with it all and the deal was done. I would return the following week with new tyres and the necessary tools to service the chassis to enable me to safely tow it home.
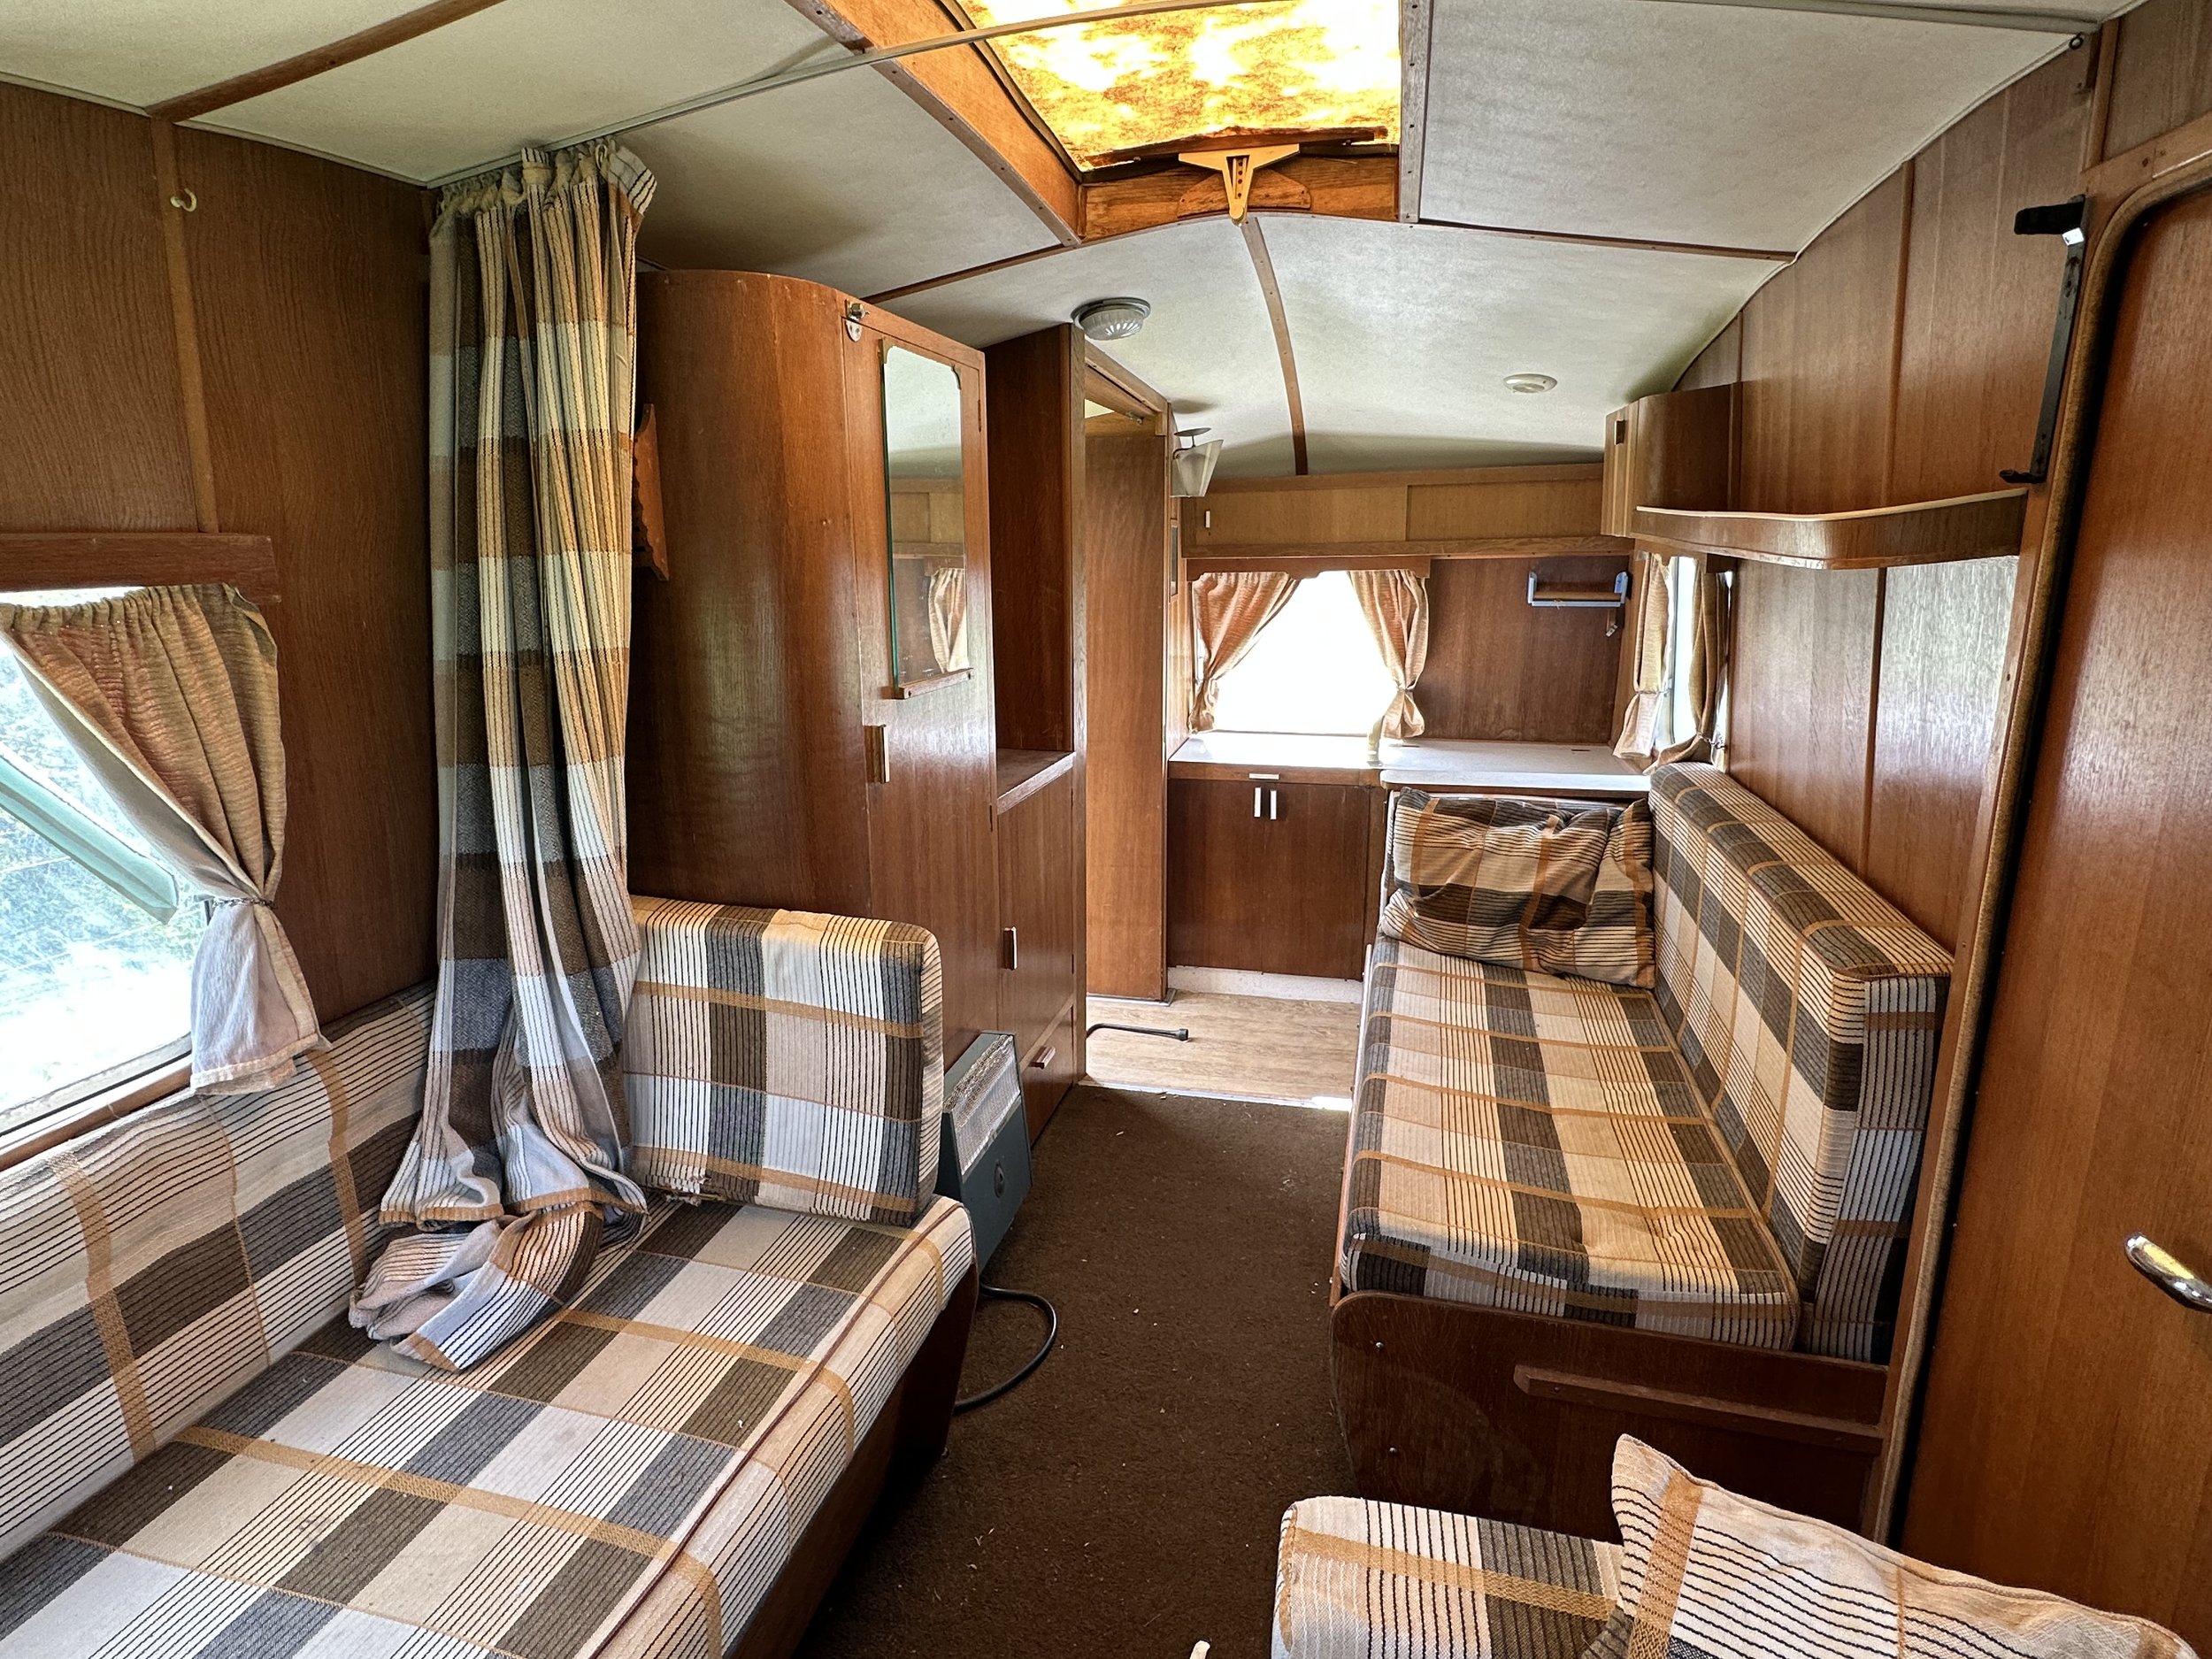
The interior was tired, but the whole caravan was something of a diamond in the rough.
The following week, I returned and spent some time stripping down the wheel hubs, checking the brakes and attaching a trailer light board. To my amazement, the brakes were in great shape, the bearings had minimal wear and even most of the original road lights still worked!
The 75-mile journey home was a breeze. I had forgotten just how well Cheltenham caravans tow. They’re probably the best road performing caravan of all time. I would proudly shout that from the roof tops with full confidence! The chassis design as detailed at the start of this article was still performing well, this caravan is unshakable on the road!

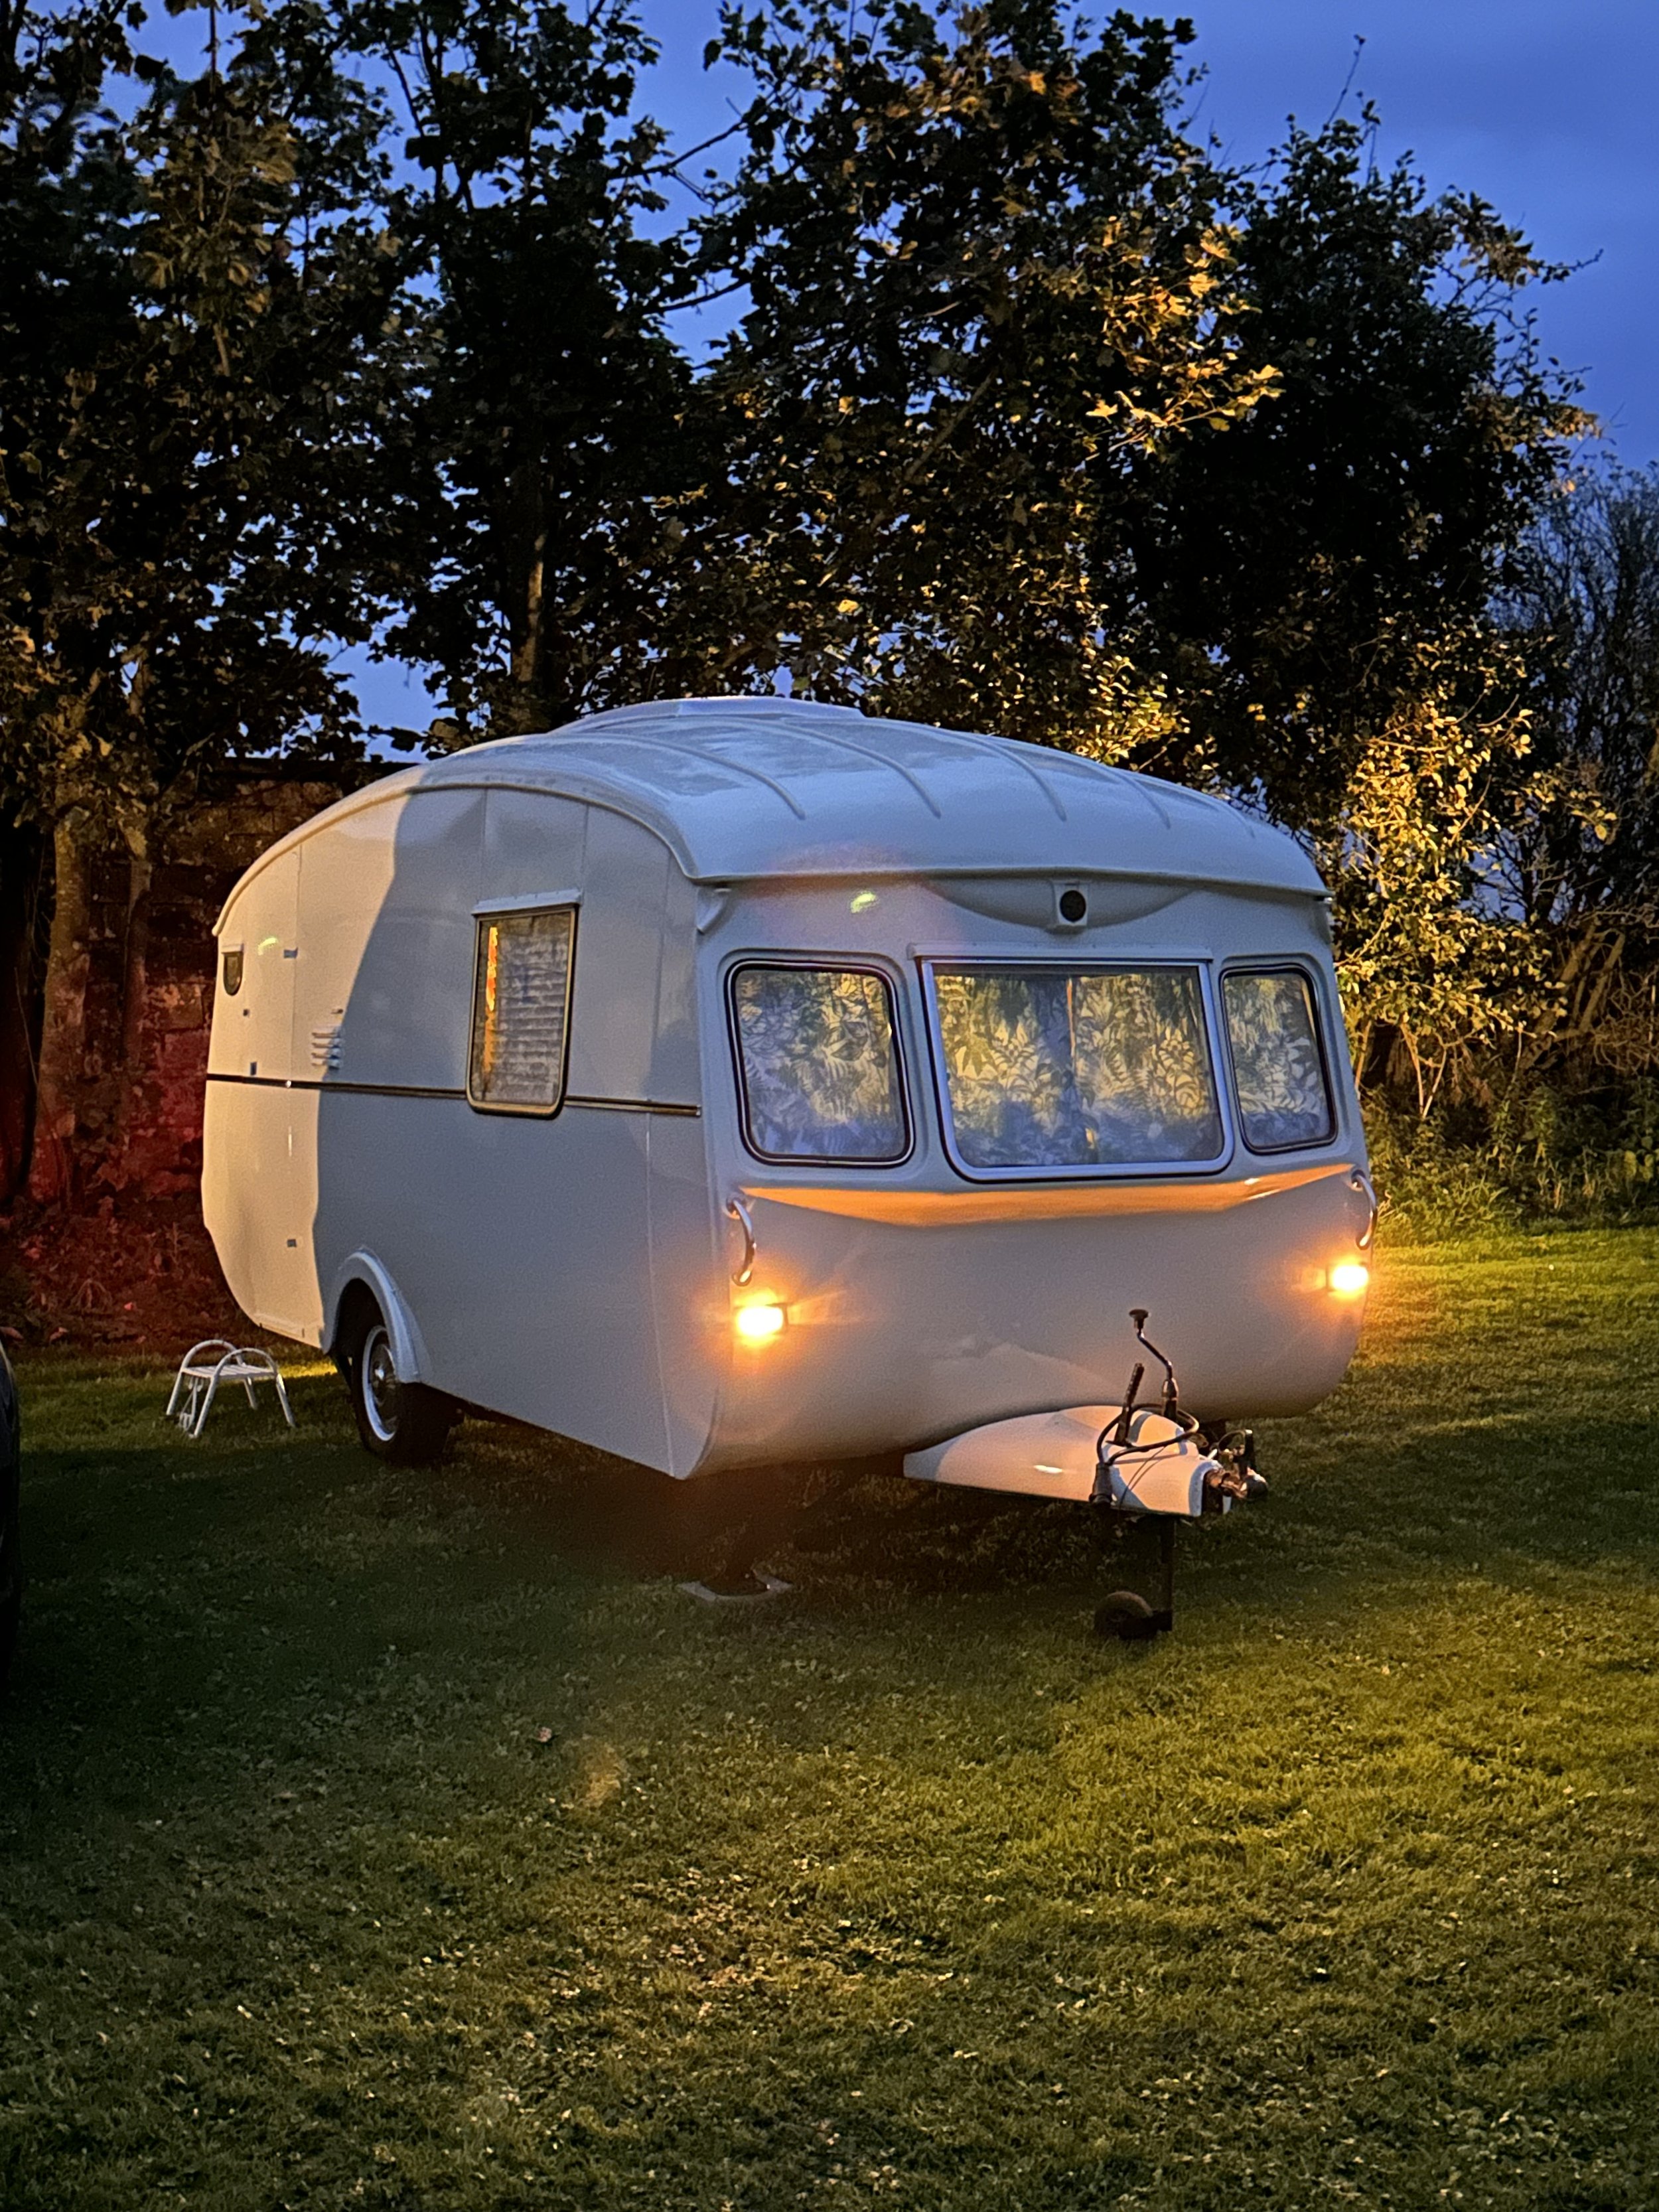
Despite all the dirt and grime, she’s still beautiful!
Once safely home, the Cheltenham got a thorough clean inside and out to see what I was working with. Although I’d clearly been a little bit misty-eyed when buying it, it wasn’t terrible, though it quickly became apparent that the interior was certainly a lot more worse for wear in the broad daylight. I would have to come up with a plan…

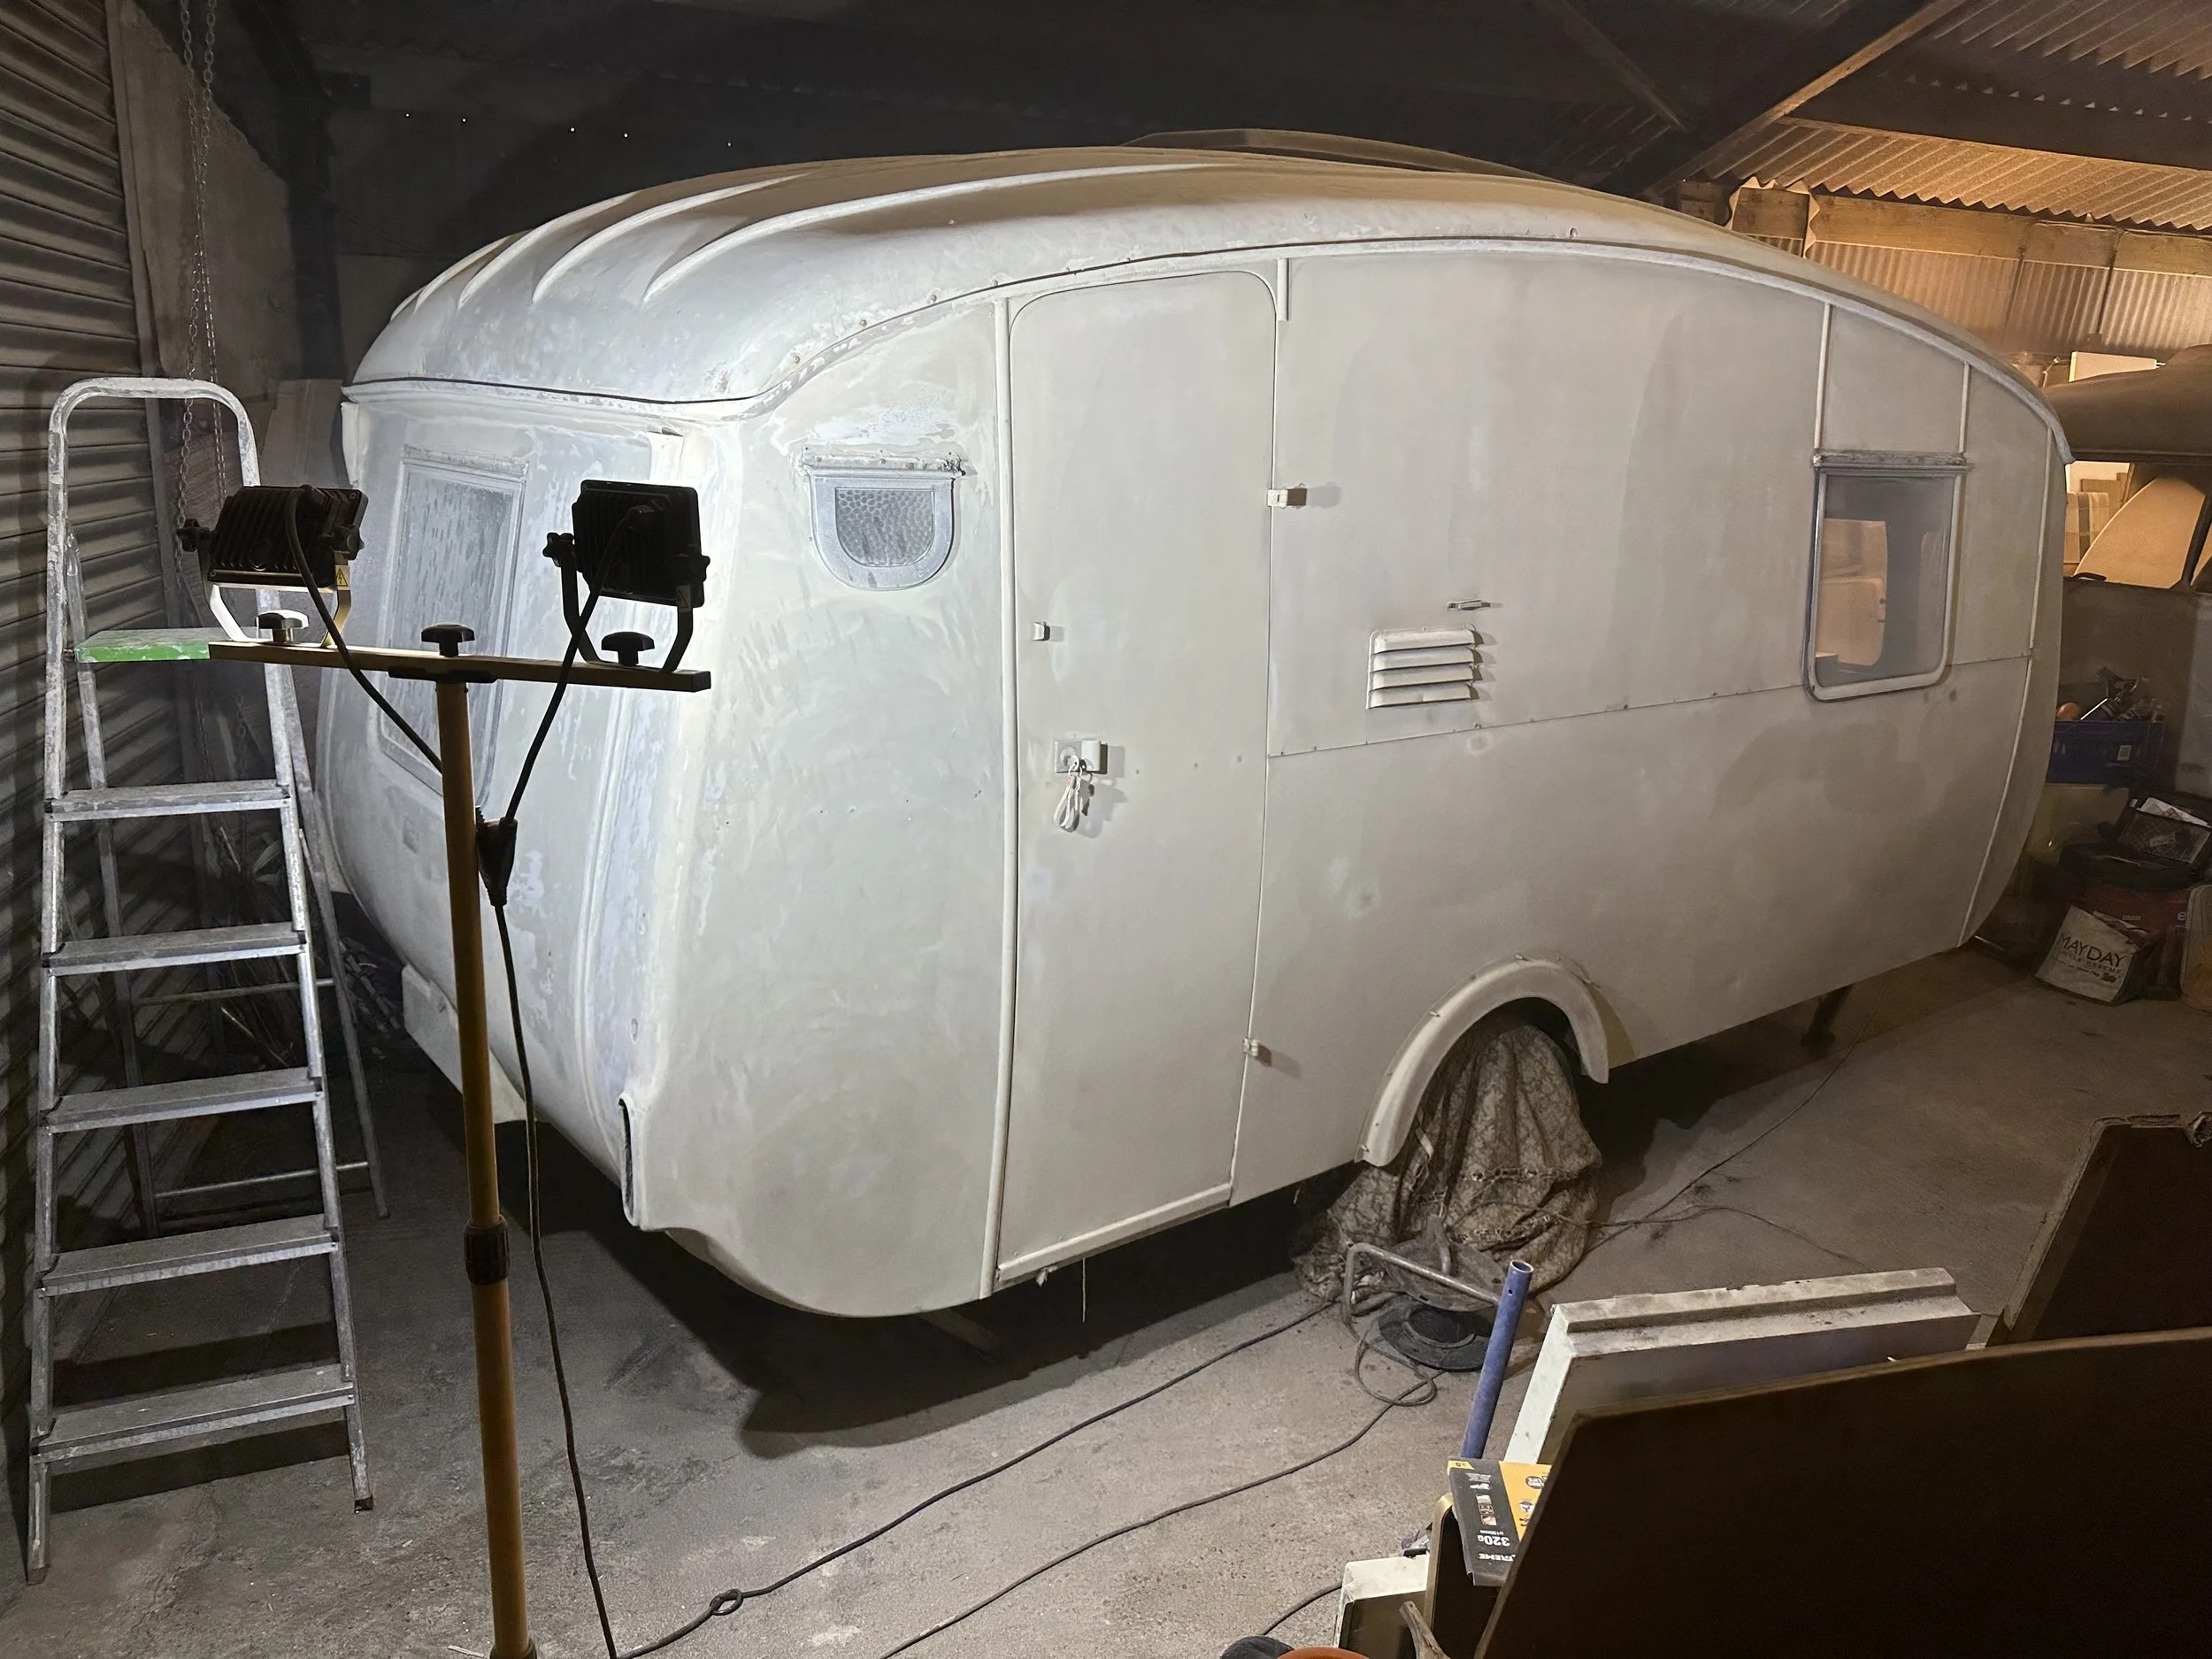
Starting work on the Cheltenham - sanding those intricate GRP panels was very time consuming.
I was facing a quandary with this project: Do I try to keep it as original as possible or make it into something that would suit us?
I decided to approach the project with an attitude that satisfied both ideals. We would keep everything that gave this caravan character where we could. The curved wooden furniture, the original gas lamps and electric lights, the adorable fluted glass-fronted china cabinet, the clever front cutest of drawers with bureau style table… but we would update the soft furnishings, flooring and the impractical original kitchen.
I started the project with how I start all my projects - a Pinterest board. I can lose hours just dreaming of all the possibilities and my creative mind just races with ideas. I become a bit all-consumed with planning and calculating how I can achieve my goal.

Despite appearances, the chassis was in good condition and the running gear all worked.
I started work on the caravan with the chassis and running gear. Although I’d done a pretty thorough check before I towed the caravan home, that was just a roadworthiness check and the chassis would need more in-depth work long term. Luckily for me, the hitch was all free and the brakes worked well. I stripped the hitch down and managed to source a new hydraulic hitch damper via the Cheltenham Owners Club. I also managed to source some brake parts from eBay using the parts reference guide that the Cheltenham Owners Club give to their members. All in all, the £15 annual membership fee had already proved itself invaluable!
Although the interior wall boards were solid, the oak-facing veneer was badly damaged and sun-bleached. The temptation was to re-varnish the boards, but on closer inspection, many had large chunks of the oak facing missing. I loathed to replace them as they were solid. Forgive me while I digress: I hate seeing restorations where people just gut absolutely everything from a caravan for the sake of it. In my experience, newer materials rarely stack up to ones from 60 years ago. There’s also the “green” issue which weighs on my mind. It would seem such a waste to gut this caravan, but I admit that I would have to do something to improve its cosmetic appearance.

The interior wall boards were too damaged to leave alone but too solid to needlessly replace.
The simple answer would be to paint the wood and use various filling products to repair some of the imperfections. But it wasn’t really the look that I was wanting to achieve. Inspiration came from an unlikely place. We visited a dealership that sold Adria caravans, and we fell in love with the Adria Altea range. The walls were covered with a grey felt-like material which looks very contemporary and cosy.

Although not original, I love the felt wall coverings and think they complement the original furniture well.
The felt was a stroke of genius. It was easy, quick and cheap to source and fit. It adds hardly any weight to the caravan too. This spring-boarded the interior design choices and helped me narrow my focus on my sprawling Pinterest board.
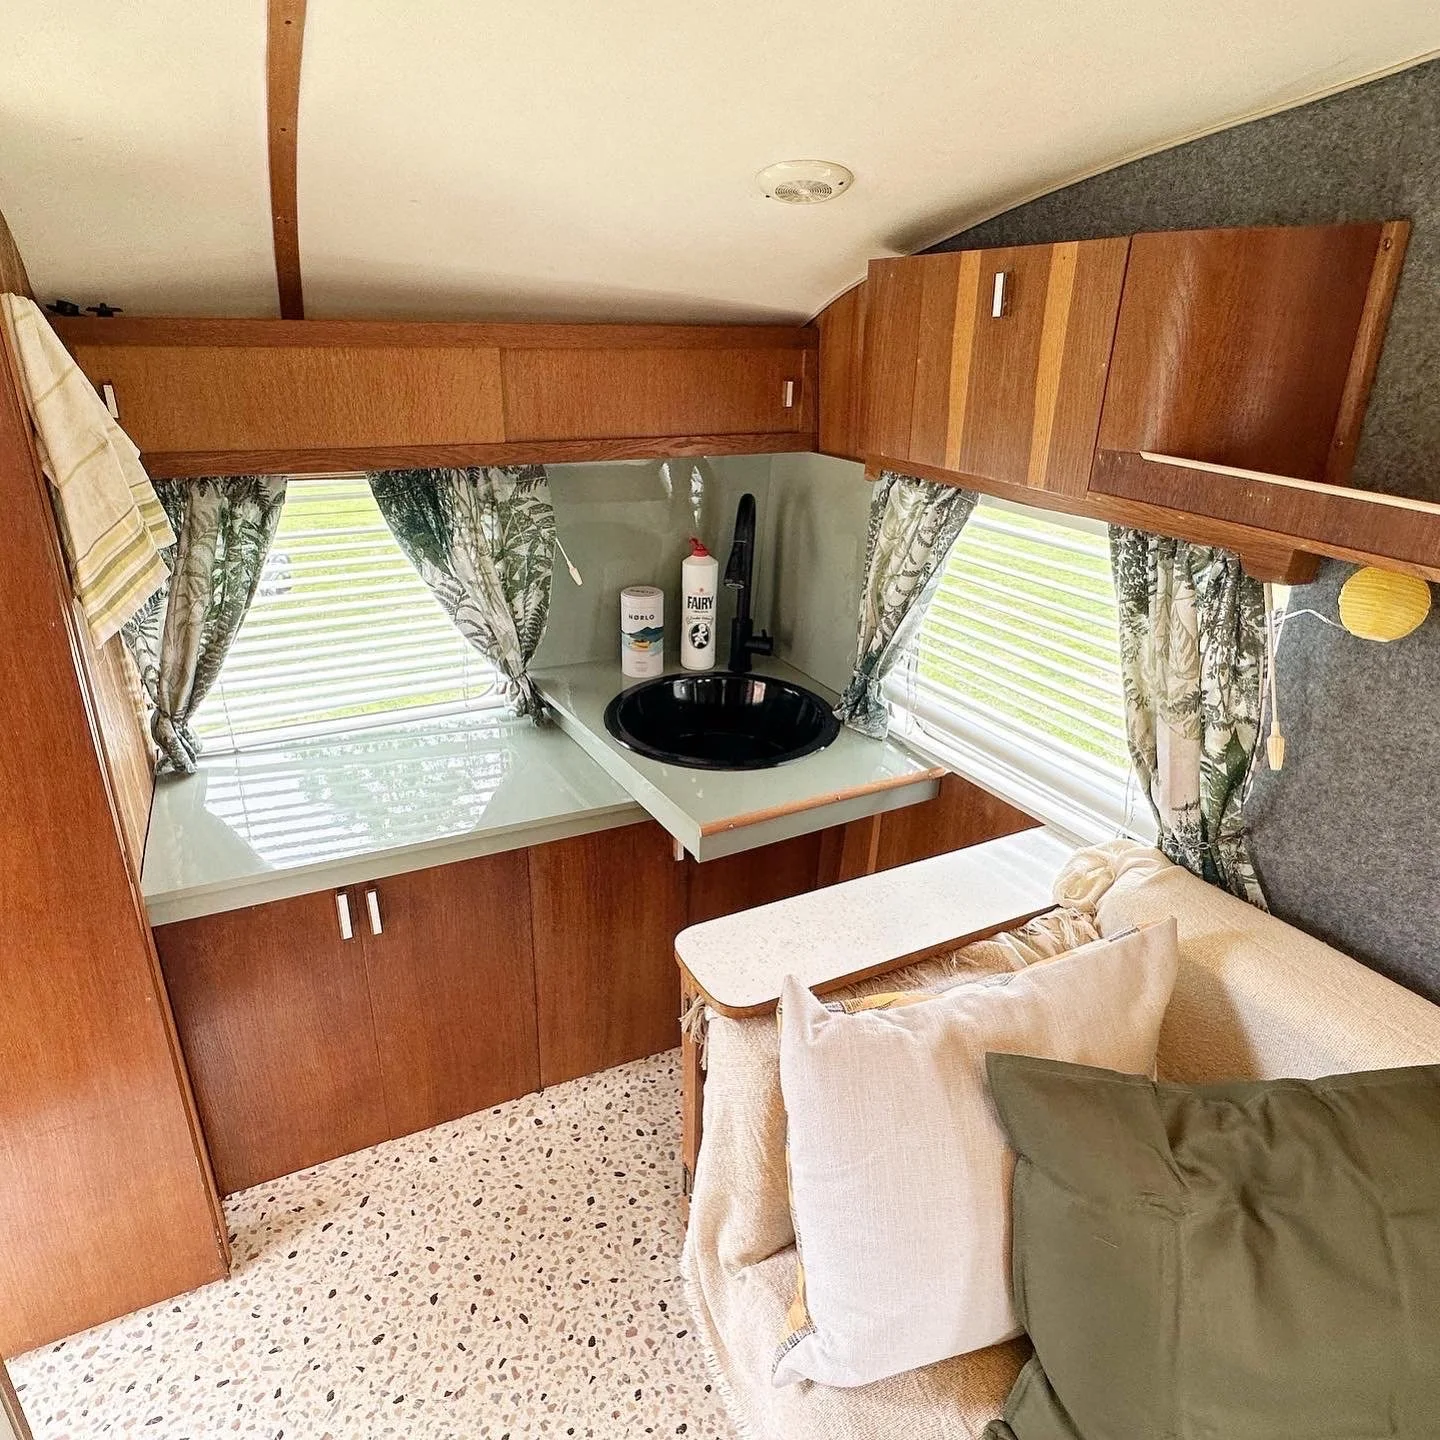
Another colour scheme was also chosen by accident. During a visit to IKEA, we discovered some heavily discounted thin worktops in the Recycling Hub part of the store. These were mere pounds each, maybe £6 - £8 per worktop piece depending on the size, and they’re finished in a gorgeous sage green colour. I couldn’t buy them fast enough! This inspired me to re-think the kitchen and come up with a way to make it more suitable for cooking.

The original kitchen was poorly laid out and required you to bend to use the sink and cooker, so something had to change.
The original kitchen was definitely the poorest designed element of the Cheltenham. To allow see-through vision when towing (the ability to see right through the caravan in your vehicle’s rear view mirror), the kitchen was lowered to fit under the low-slung rear window. The consequence was a back-breaking low worktop height. The original perspex sink was very badly scratched and stained, so something would have to change.
Inspiration came from a visit to the Cheltenham Owners Club National Rally, where I got to get up close and personal with several Cheltenham models. Of interest to me was a 1969 Puku 4, which is five years newer than mine, and featured a re-designed kitchen to lift the sink to a more sensible working height, just under the offside rear window. It was this design change that I would incorporate into my new kitchen.

Armed with inspiration from a 1969 Cheltenham model, I set to work assembling a new kitchen area.
I saved all the original cabinetry and managed to integrate the new worktops seamlessly. I began to really enjoy seeing the juxtaposition of the hand-crafted original interior and the very deliberately modern worktops and wall coverings.
With the interior progressing as a rapid pace, it was time to tackle the exterior. Any confidence that I’d built up with the ease of renovating the interior was about to be shattered when it came to tackling the 60 year-old bodywork…

Having experienced many victories with refurbishing the interior, the exterior would fight me all the way.
I planned a steady but already very tight six-week countdown to the respray with a friend of mine with a paint shop. The dramatic twist in the story was that he had a cancellation and four weeks into my six-week countdown, he offered to squeeze me in at a slightly reduced cost to keep his workshop busy. I had to say yes!
What followed was an uncomfortably intense three days of bodywork preparation. I was really glad that for once in my life, I’d actually paced myself well with a project, and the front, rear and removable fibreglass trims were already sanded down. My usual tool of choice for sanding is a random orbital sander with 120-240 grit sandpaper. 120 grit will get the worst of a bad flaky paint job off, or the usual five layers of paint that you often find on a vintage caravan, and the 240 grit is a sensible finishing disc, which leaves a smooth surface ready for paint.
Of course, all of this would go completely out of the window when it came to the complex fibreglass panels on the Cheltenham. I found a small vibrating palm sander with 360 grit sheets on it was about the right tool for the job. A coarser grit would begin to eat away at the delicate fibreglass gel coat. Despite this, the severe complexities of the Cheltenham’s elaborate front and rear mouldings actually called for much sanding by hand. The result was, the front and rear panel alone took about a week to prepare each!
A change of plans made this job a lot more stressful than it should have been…
Luckily for me, the side panels are smooth aluminium, so I got those sanded back in one afternoon. But the curvaceous one-piece fibreglass roof was not going to be so kind. The strengthening ribs in the roof panel required sanding by hand, and various small cracks and holes needed filling with epoxy filler. It would need a coat of epoxy primer to prepare the fibreglass for the base coat.
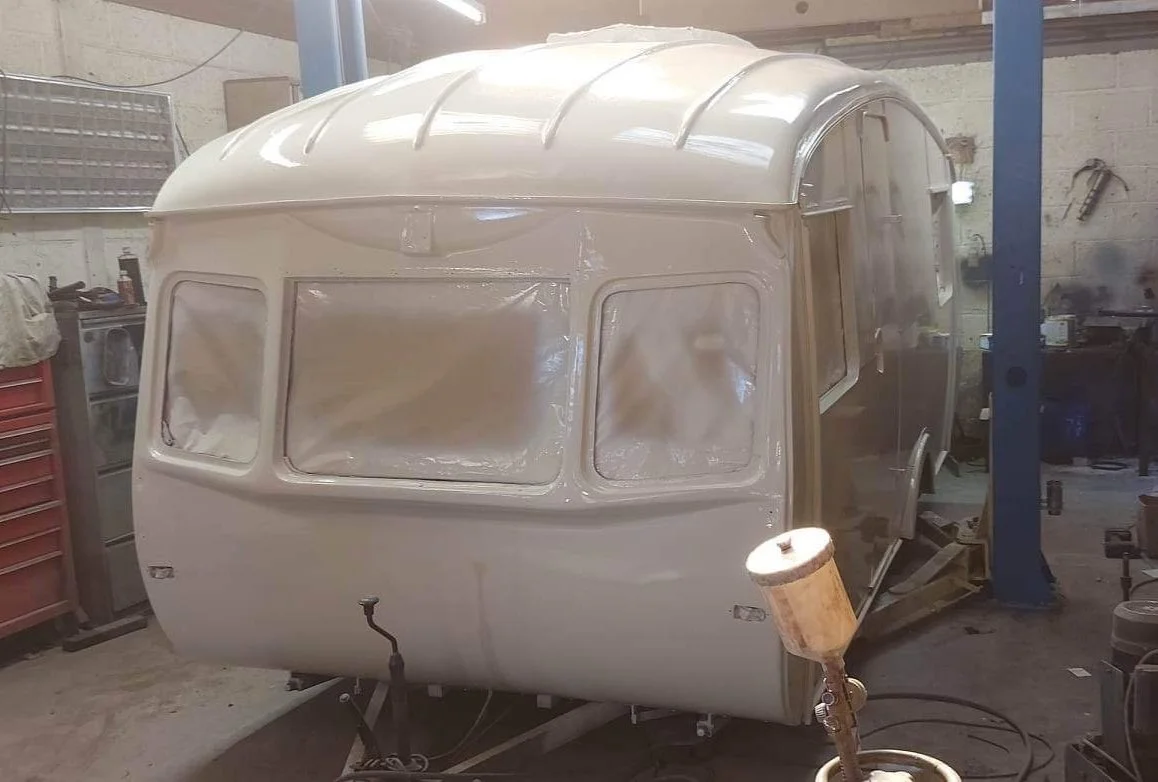
My friend resprayed the caravan for me once I’d done the preparation work.
I persevered and eventually made it to the paint shop on time. I was exhausted and covered in paint dust, but when the doors went up on the paint shop to reveal the beautifully shiny Cheltenham, it all felt worthwhile! Now would begin the seemingly never ending job of actually finishing off the caravan…
First up was to re-fit the exterior trims and windows. The side windows were straightforward; I polished the aluminium frames by hand using Autosol aluminium polish and fitted new window seals from Woolies Trim. Everything fell apart when it came to re-fitting the front end fixed windows with their car windscreen style seals. The wood around the windows needed replacing first, which was easy. But the initial seals I bought from a rival supplier to Woolies were of truly abhorrent quality. They ripped to pieces in no time, despite using the correct tools for the job.

Poor quality window seals were another issue that I faced when putting the caravan back together.
By now I was fed up. I was still exhausted from the paint ordeal and I now had a tight two-week deadline to get the Cheltenham ready for its first weekend away at a Retro Camping Club rally. I did something that I very seldom do when restoring a caravan - I called for help. This came in the form of a local windscreen fitter, who not only supplied much higher quality seals but fitted them perfectly. Even as a professional, it still took him a few hours and I’m hugely grateful for his perseverance. I think it goes to show that you can accept your shortcomings and sometimes it’s just better to get a professional in to do a job if you can afford to.
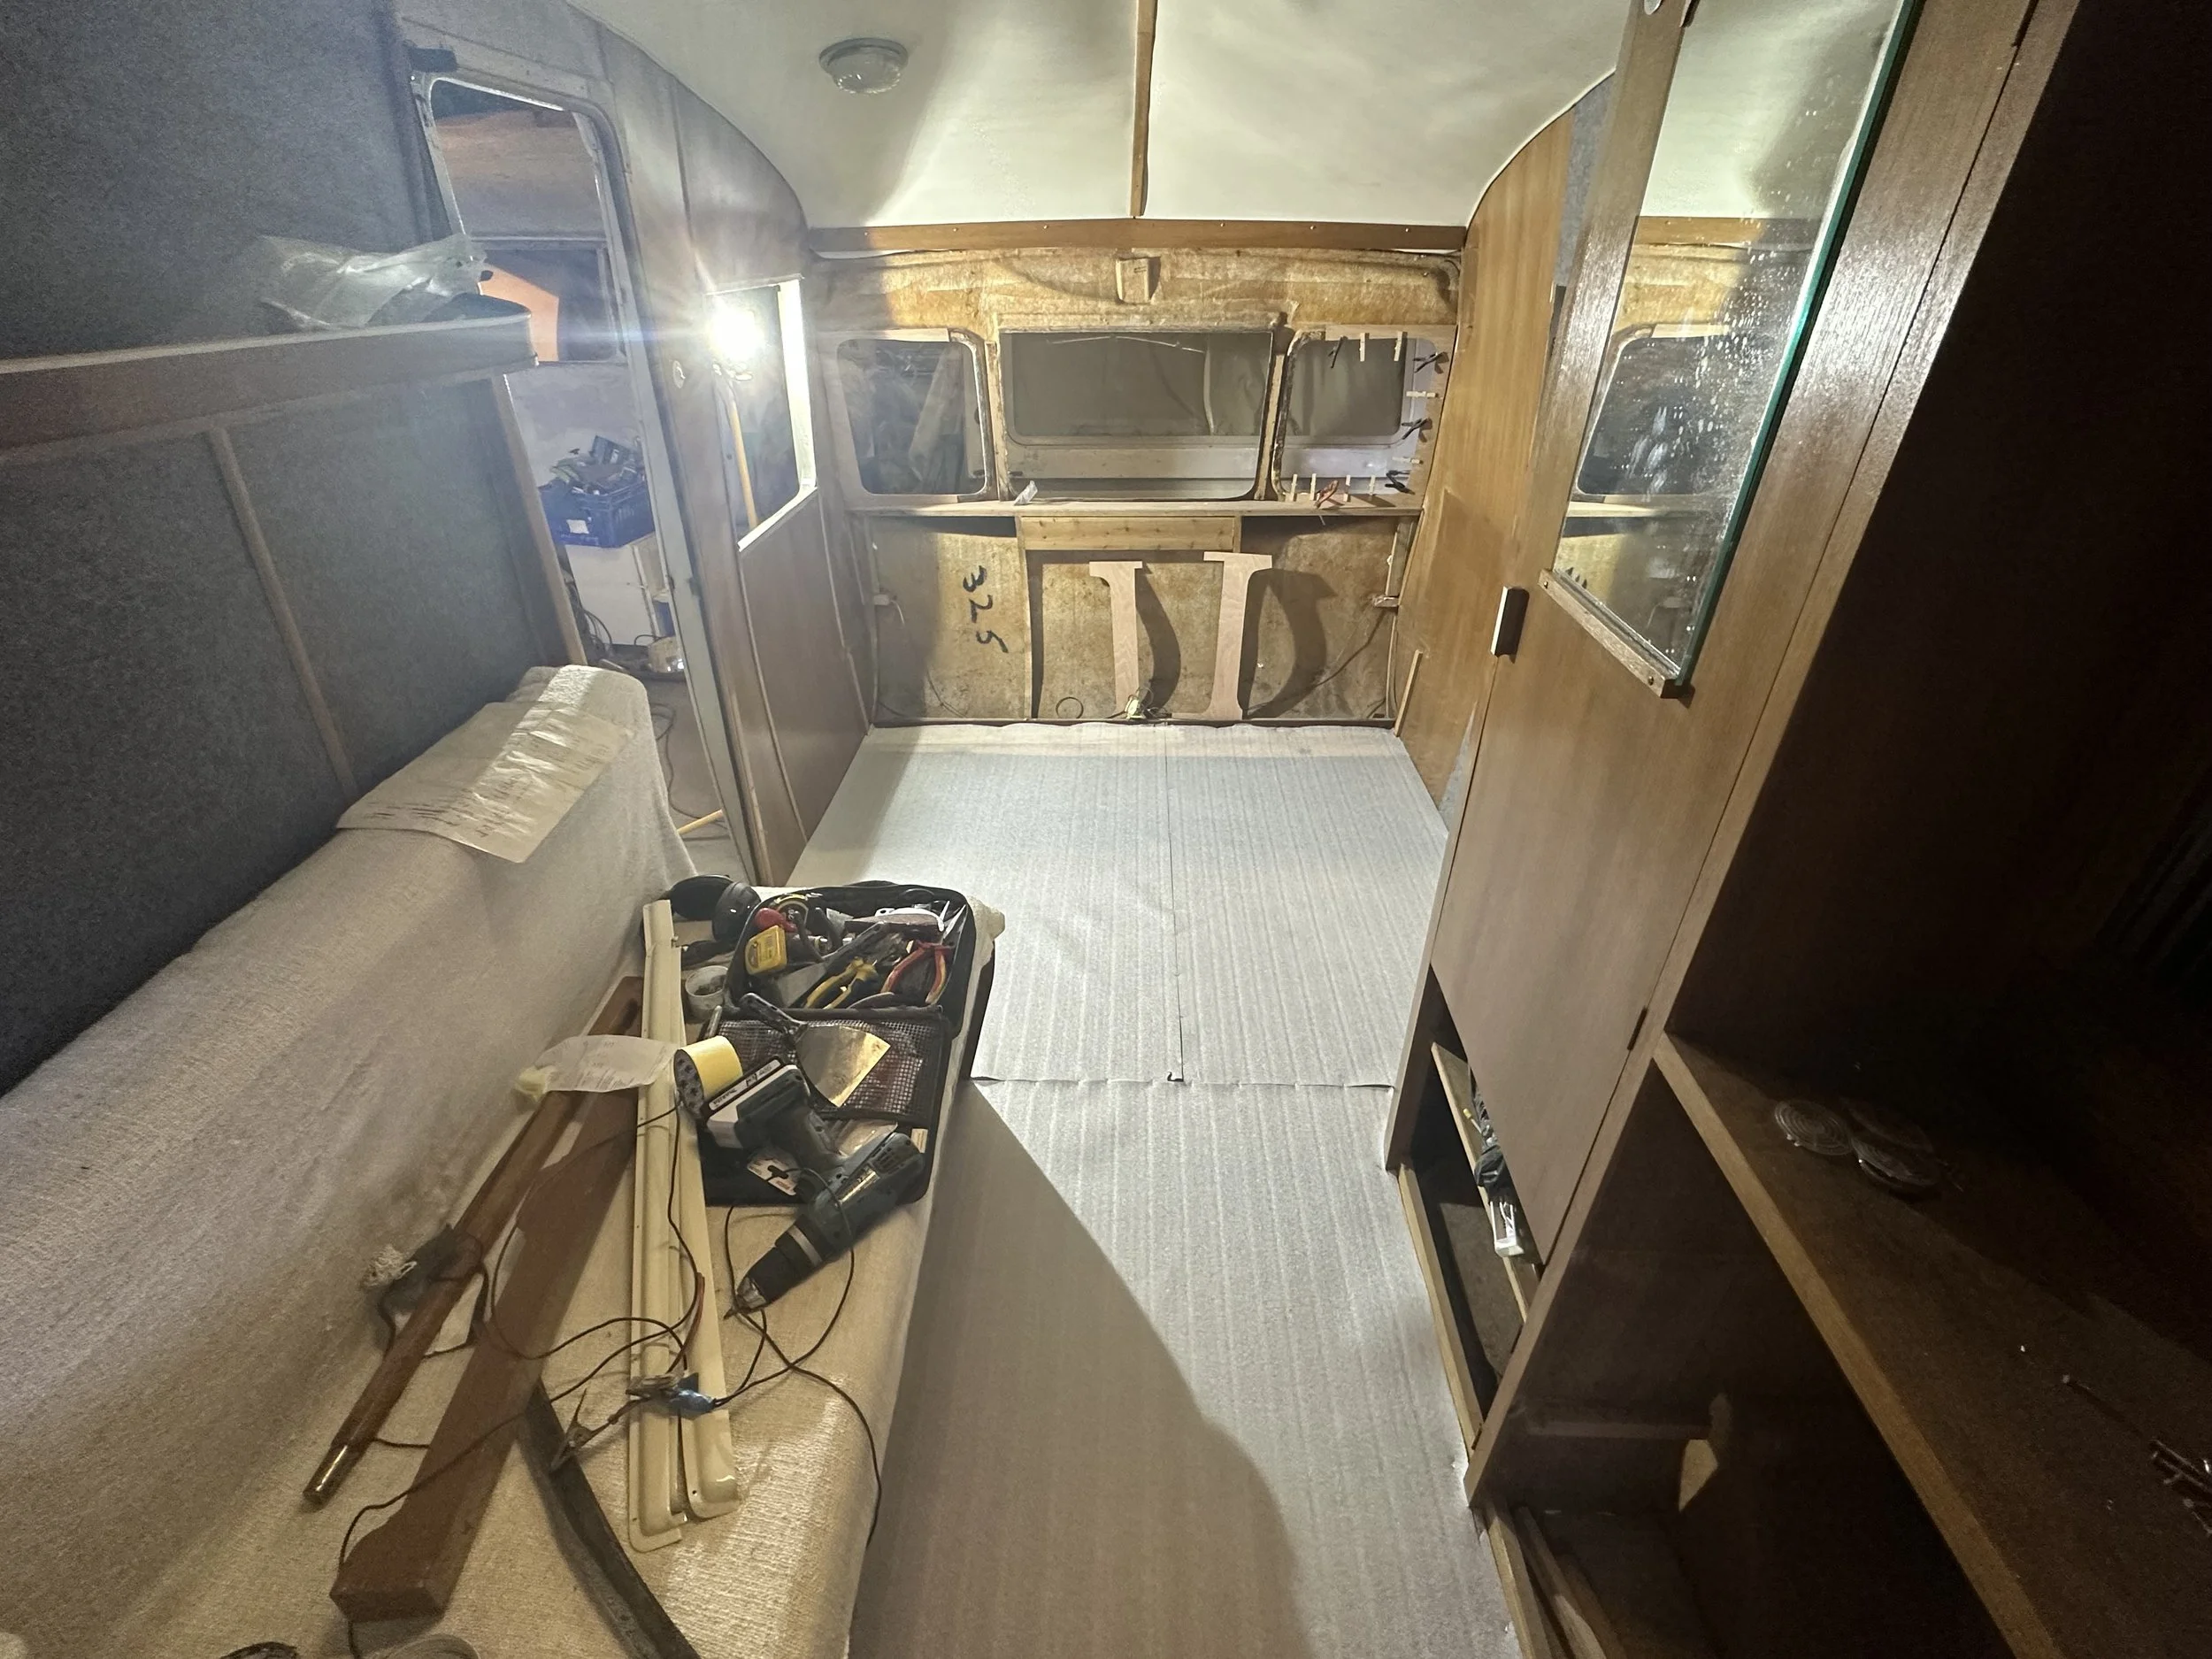
It has to look worse before it looks better, right?
It was surprising to me just how long the interior would take to finish. Every single job seemed to require a work around or additional steps to finish it off. It’s safe to say, the caravan fought me all the way at this stage. Sheer determination was all that got me through it.
I fitted a new vinyl floor covering which I sourced online. Its retro-inspired terrazzo pattern complemented my chosen colour palette in addition to brightening up the interior when combined with the darker original woodwork.
Time consuming interior jobs included fitting an Electrolux fridge from scratch. What appeared to be an easy case of removing a cupboard door to fit, evolved into a lengthy procedure to modify the cabinetry to make it fit. Even then, it went in so snugly against the wheel arch that there was no room for error! At this time, I updated the existing mains electrics and fitted a proper 12v system, which included a mains battery charger, quick-release battery clamps and safety fuses.

Fixing the electrical system took longer than expected.
As usual, the project came down to the wire when it came to meeting the deadline. From fitting the new water pump to re-fitting the original road lights, everything seemed to fight me and turn into a massive job.
A few things that got me through it was seeing the interior come together. The curtains that I’d sewn were made using some fabric from Habitat, which is so harmonious with the rest of the interior. Another lucky stroke was sourcing an original aluminium window blind set from another Cheltenham caravan. Though incredibly fiddly to fit, I couldn’t deny that they really look the part and give the caravan a really classy boost.

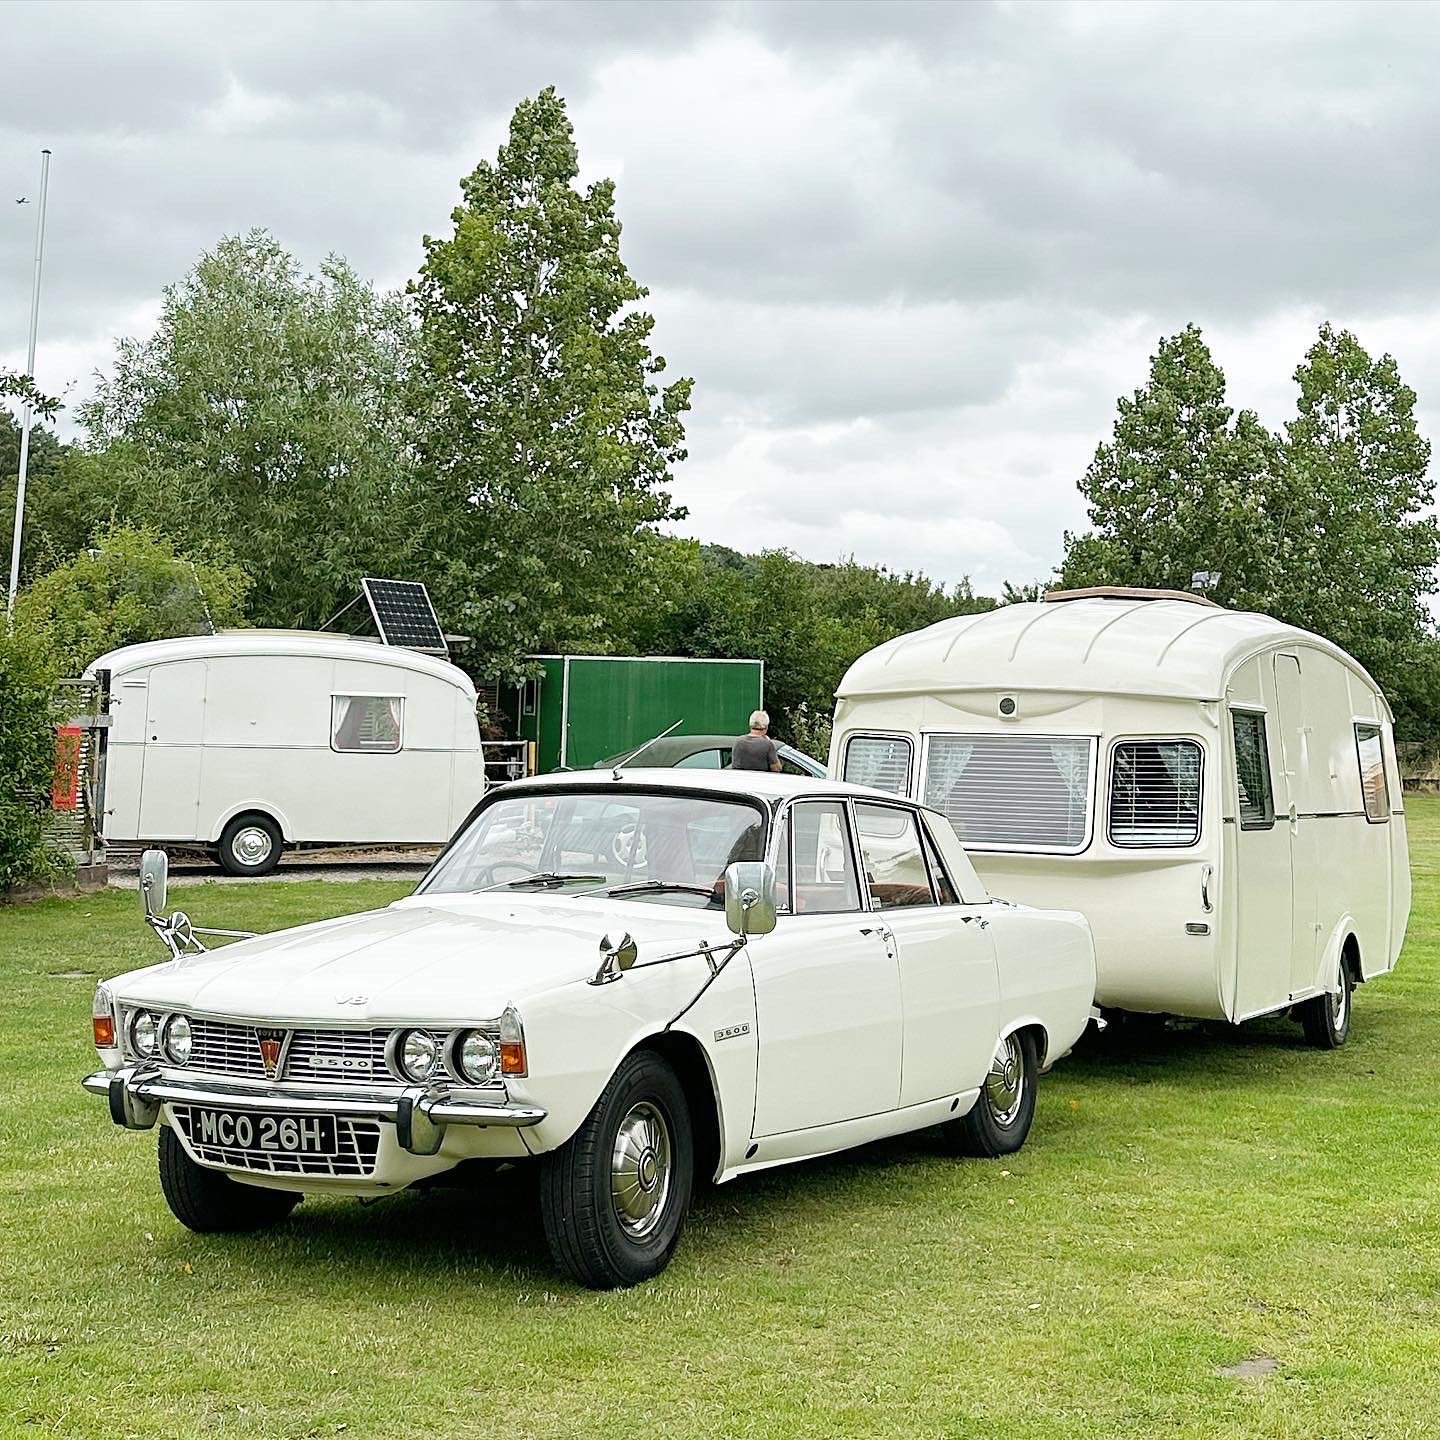
It’s always really exciting when the finished caravan finally gets hitched up to hit the road!
With the drama of the restoration still fresh in my mind, it was with some relief and bewilderment that I raised the corner steadies and gently pushed it out of my workshop to hitch up to my 1969 Rover P6 3500 and set off for a weekend away. Was I mad? Certainly.
It’s always an anxious first few miles when you’re towing a newly restored caravan. You’re listening for noises, looking for bits dropping off and partly expect the whole thing to just implode for ten minutes or so. I needn’t have worried. The Cheltenham, as explained in my first article about it, tows impeccably. The smooth Rover V8 effortlessly burbled along and the Cheltenham stuck to the road with an assurance that modern caravans could only dream of.
I made it to site in one piece!
I arrived at the venue for the 2023 Retro Camping Club National Rally and AGM and this was my first assurance that just maybe I’d done an alright job of the renovation when fellow members flocked to admire my handiwork. This is where I’d have probably appreciated having a dry run with the Cheltenham before attending such an event. Although the 50-mile trip hadn’t highlighted any issues, I would soon find plenty of issues with some of the new parts that had been fitted. Chiefly the brand new onboard water pump had a faulty diaphragm which proceeded to splurge water all over the cabinetry and floor!

The finished interior is bright and airy, while retaining all the original cabinetry.
Just sitting in the Cheltenham on site allowed me the first moment of reflection since starting the project. It was all go for so many months that I never stopped to reflect on just how far the caravan had come since I picked it up just some nine weeks prior to this weekend away!
Make no mistake, the Cheltenham was far from finished, but it was usable. I’d grabbed some cheap throws from IKEA to cover the original upholstery temporarily, I still hadn’t managed to do anything with the original gas lamps and there were a lot of snagging jobs to do. But not to worry - I was out camping and enjoying it.
Besides, as much as I was reflecting on what work I needed to do still, there were some things that were finished that I was really proud of. The kitchen was the main thing. This was a real experiment for me to try and blend the original mid-century style with some modern conveniences.
The new round sink is luxurious and something that you’d find in a new caravan. It holds a normal household washing up bowl and you can actually wash normal sized dinner plates in it - something that never happens with normal vintage caravan sinks! I paired it with a household tap with pull down shower head attachment. Part of my new kitchen design was to incorporate space for a free-standing Cadac cooker. My thought process was that most of us carry additional external cooking equipment anyway, why not just make the external hob part of the internal kitchen so that only one needs to be carried? Besides, the Cadac cooker with its interchangeable pan stands and grill pans is much easier to use and clean than any fitted caravan hob that I could find.
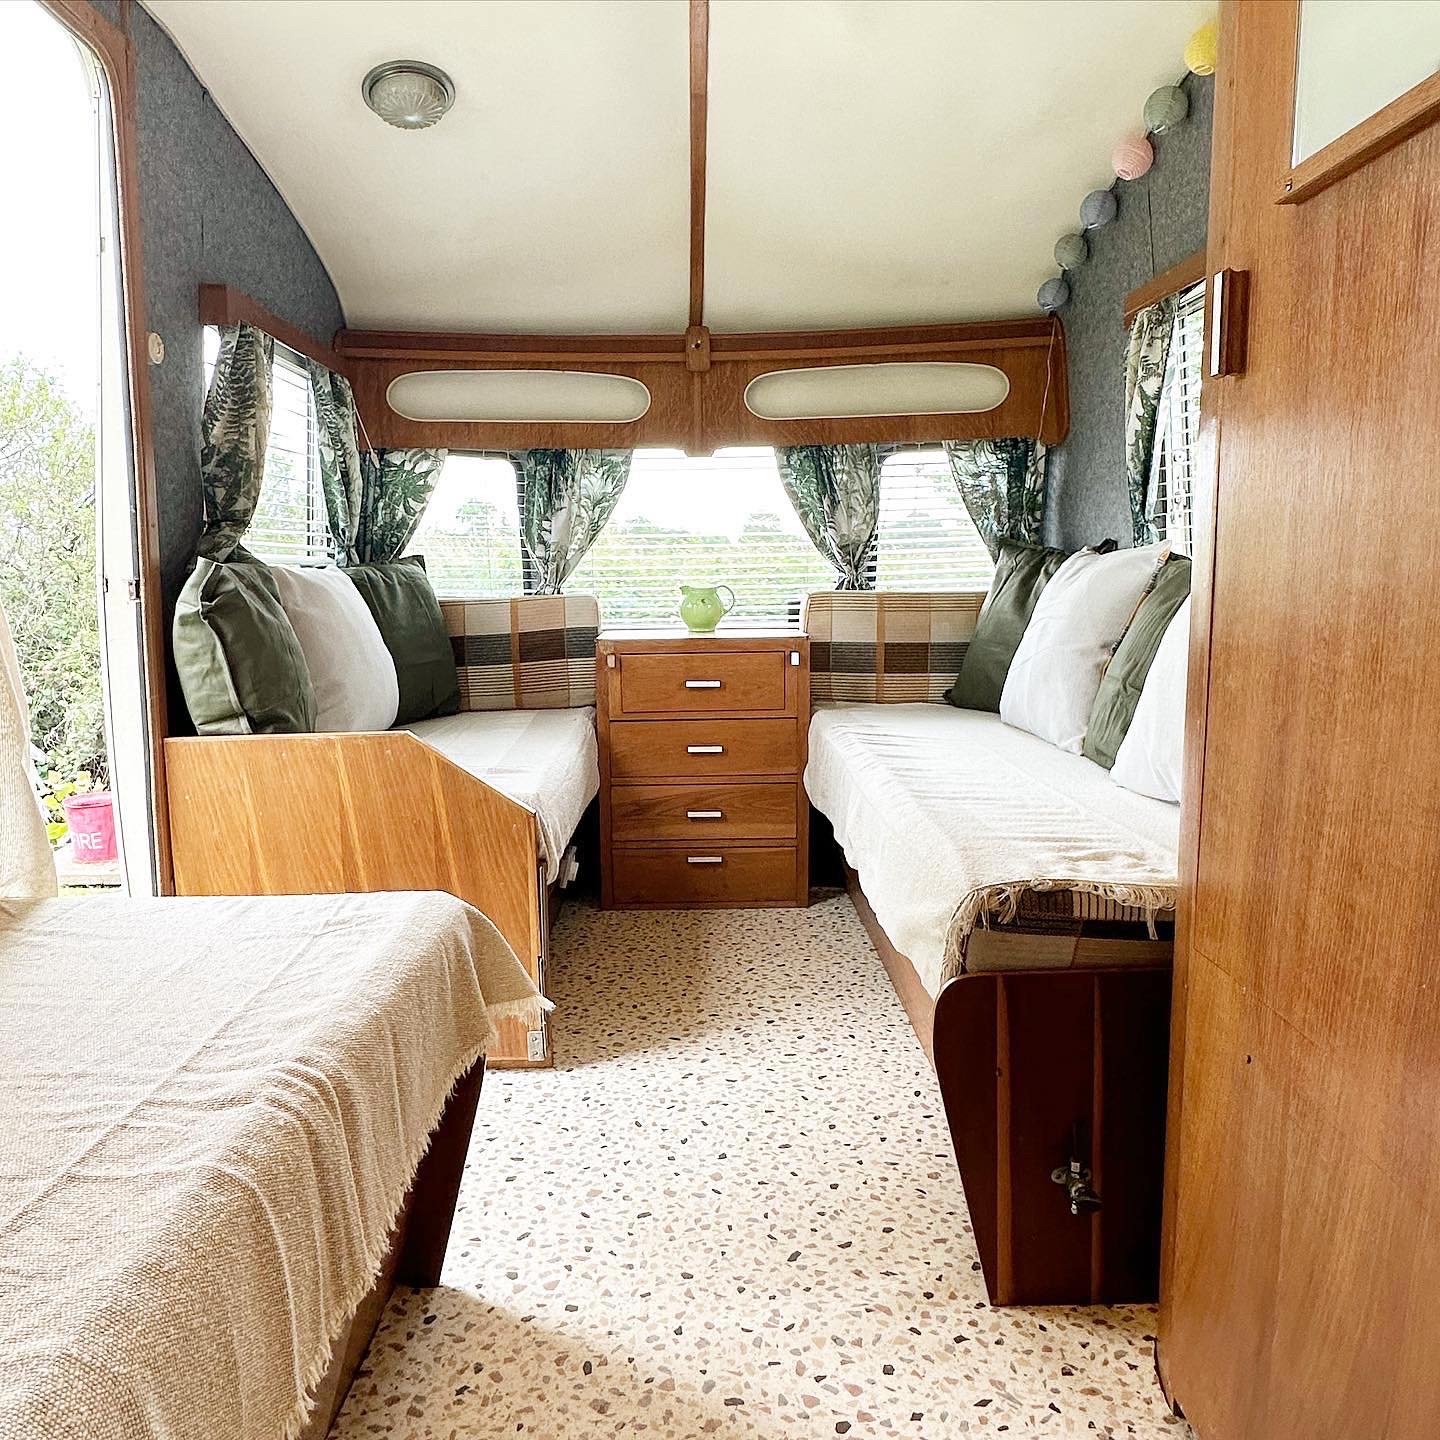
I’m really pleased with how the interior turned out.
The kitchen wasn’t the only thing that I was proud of. I was overwhelmed with how cohesive the interior turned out. It was more or less exactly how I envisaged it for all those months. To just sit in it on a campsite and slowly absorb all the details that I’d occasionally been kept awake at night plotting was really rewarding. I felt like I’d preserved the heart of the caravan by keeping all the features that made the Cheltenham so lovely. Even the real wooden furniture had restored well, whilst preserving its patina that breathed so much character into the design.
The weekend went well. The Cheltenham is a cosy place to be in, which just envelops you in its curvaceous cocoon-like body shell. I had absolutely no regrets about taking this project on whatsoever. The pride it fills me with to pull onto a campsite with this gorgeous caravan is immense.
If you have the skills or the funds to take on a vintage caravan, you should do it. It’s an ecological alternative to buying new, and you end up with something that has character, style and reflects your personality. And if it’s lasted 60 years already, it’s probably good for another 60.
If you want a more interactive tour of the caravan, check out my YouTube video about it here: